
Siding and Window Trim: Caulking & Flashing Best Practices
- Understanding Caulking and Flashing
- Importance of Caulking and Flashing in Siding and Window Trim
- Materials and Tools Needed
- Step-by-Step Guide to Caulking and Flashing
- Real-Life Case Study: Caulking and Flashing in Action
- Why Choose Total Roofing Hub
Understanding Caulking and Flashing
When it comes to siding and window trim installations, two essential components that ensure your home stays weather-resistant and protected from the elements are caulking and flashing. Both of these materials help seal gaps and prevent water from infiltrating the structure, which can cause significant damage over time.
Caulking is a flexible material that fills gaps or cracks between materials like siding and window trim. Flashing, on the other hand, is typically made of metal or plastic and is installed at critical junctions, such as around windows, doors, and chimneys, to divert water away from vulnerable areas. Proper use of both caulking and flashing is critical to maintaining the integrity of your siding and window trim and preventing costly water damage.

Importance of Caulking and Flashing in Siding and Window Trim
Caulking and flashing work together to provide a waterproof seal that protects your home. Without them, gaps in the siding or trim can allow moisture to seep into the wall structure, leading to mold, rot, and even structural weakening. These issues can not only be costly to repair but can also compromise the safety and comfort of your home.
By using caulking and flashing effectively, homeowners can significantly extend the lifespan of their siding and window trim. Flashing protects the areas most vulnerable to water infiltration, such as the base of the window or where siding meets the roof, while caulking seals any minor cracks and joints where water could enter. When both are applied correctly, they prevent leaks, protect against drafts, and improve the overall energy efficiency of your home.

Storm Pros Commercial & Residential Roofing And Construction
ColumbusMuscogee CountyGeorgia
2605 W Britt David Rd, Columbus, GA 31909, USA
Materials and Tools Needed
Before you begin applying caulking and flashing, you’ll need the right materials and tools for the job. Here’s a list of what you’ll need:
- Caulking (silicone, polyurethane, or acrylic latex)
- Flashing material (metal, vinyl, or other weather-resistant options)
- Utility knife
- Caulking gun
- Measuring tape
- Roofing nails (if necessary)
- Hammer or nail gun
- Cleaning supplies (to remove old caulk or debris)
Once you have the materials and tools ready, you can begin the process of applying caulking and flashing. It’s important to use high-quality materials to ensure the best protection against water infiltration and weather damage.
Step-by-Step Guide to Caulking and Flashing
Follow these steps for a professional-looking and effective caulking and flashing installation:
1. Clean the Surface
Begin by cleaning the area where you will be applying the caulk and flashing. Use a utility knife to remove any old caulk or debris, and ensure that the surface is free of dirt and moisture. A clean surface ensures that the caulk will adhere properly and create a long-lasting seal.
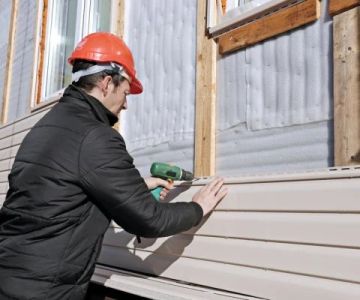
2. Apply Flashing
Start by installing the flashing around the window or door trim, ensuring that it extends slightly beyond the edges of the trim. Use roofing nails to secure the flashing in place, making sure it fits snugly against the siding and directs water away from vulnerable areas. For best results, overlap the edges of the flashing to ensure no gaps remain.
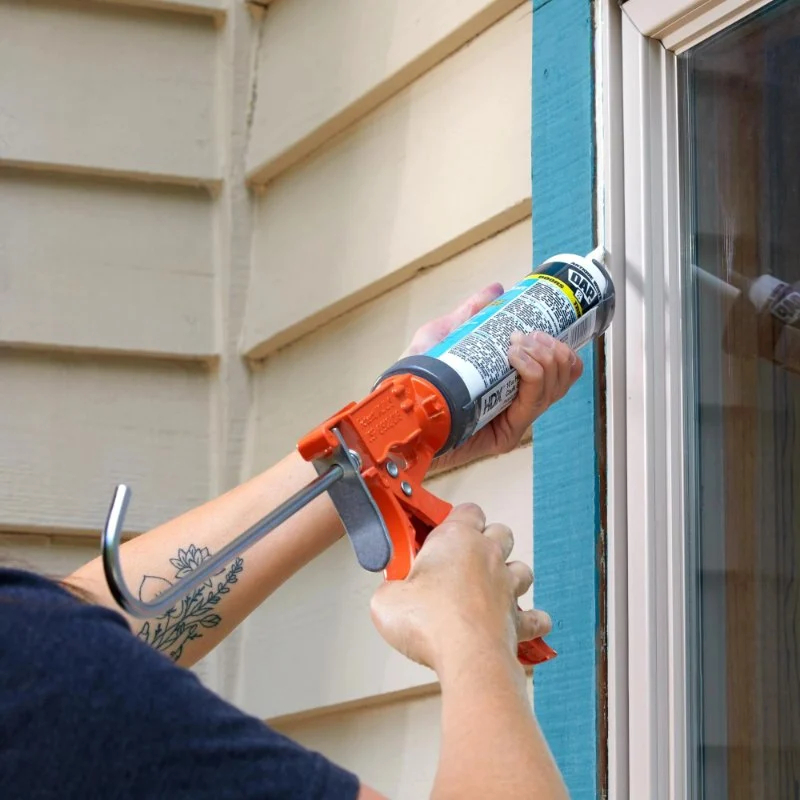
3. Apply Caulking
Once the flashing is in place, use a caulking gun to apply a generous bead of caulk along the edges of the trim, siding, and flashing. Be sure to fill all visible gaps or cracks. Smooth the caulk with a damp cloth or caulk smoothing tool to create a neat, seamless finish. Allow the caulk to cure according to the manufacturer’s instructions before exposing it to moisture.
4. Inspect the Seals
After the caulk has cured, inspect all seals to ensure that they are tight and secure. If you notice any gaps or missed spots, reapply the caulking and allow it to set again. A proper seal is crucial to prevent leaks.
Real-Life Case Study: Caulking and Flashing in Action
A homeowner in Texas experienced persistent water damage around their windows, leading to mold growth and wood rot. After consulting with a professional, they learned that the lack of proper caulking and flashing was the main cause of the issue. The roofer removed the old, ineffective caulk, installed new flashing, and applied fresh caulk around the trim.
Within weeks of completing the work, the homeowner noticed a significant improvement. No more leaks, and the interior of their home remained dry even during heavy rains. The proper use of flashing and caulking not only stopped the leaks but also improved the home's insulation, reducing heating and cooling costs.
Why Choose Total Roofing Hub
If you are looking for high-quality materials and expert guidance for your caulking and flashing needs, Total Roofing Hub is your trusted source. Our team offers the best products and services to ensure that your siding and window trim remain protected against the elements. With a wide selection of caulking, flashing materials, and expert advice, we’re committed to providing you with solutions that will stand the test of time.
Visit Total Roofing Hub to find the perfect materials for your next project, and let us help you safeguard your home from water damage.


 Marc Joseph remodeling5.0 (1 reviews)
 PRS Roofing Inc5.0 (9 reviews)
 KAPS CONSTRUCTION4.0 (5 reviews)
 Marshall Exteriors, LLC4.0 (213 reviews)
 S.W.A.T. Roofing & Consulting4.0 (46 reviews)
 MATFI RENOVATIONS LLC5.0 (23 reviews)
 Siding Material Fire Ratings: What’s Required & What to Choose
 Roof Talk: Common Terminology Every Homeowner Should Know
 How Often Should You Replace Your Home's Siding? Expert Tips on Siding Longevity
 The Average Lifespan of Asphalt Shingle Roofs: How Long Do They Last?
 How to Choose a Reliable Roofing Contractor Near You | Top Tips and Questions
 Should I Repair or Replace My Roof? – Expert Guide for U.S. Homeowners