
Compare Roof and Siding Samples Before You Order
On this page
- Quick answer
- Define the decision before collecting samples
- Ask for the right sample types
- Compare colours in real outdoor light
- Judge texture, scale, and pattern
- Compare with fixed exterior features
- Verify the exact product and batch plan
- Build a useful mockup
- Document the final approval
- Verify materials when they arrive
- Avoid common sample mistakes
- Sample comparison checklist
- Frequently asked questions
- Next steps
Quick answer
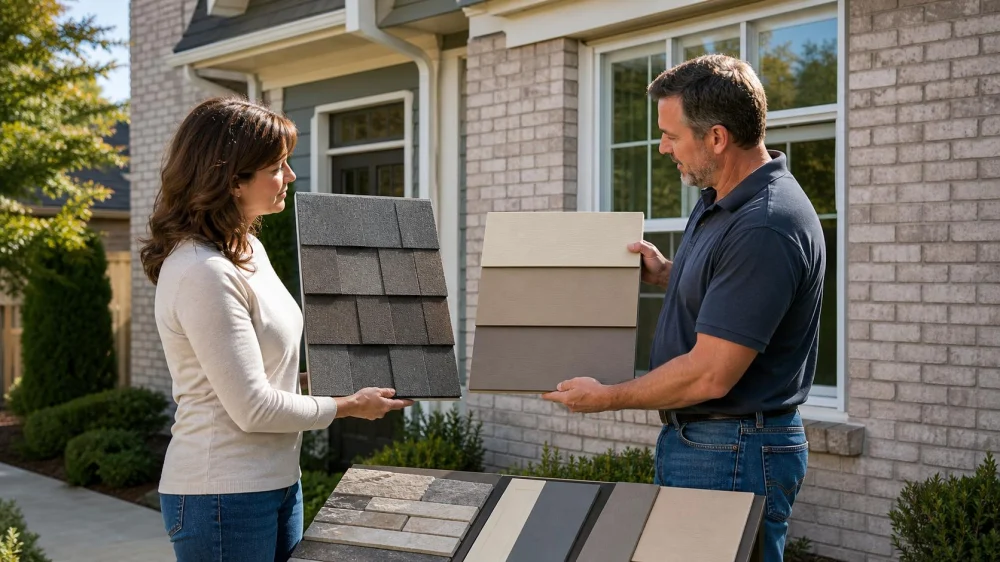
Compare roof and siding samples outdoors on multiple sides of the house, at several times of day, and beside fixed materials such as brick, stone, windows, trim, gutters, and doors. Use physical samples large enough to show pattern and texture. Confirm the exact manufacturer, product line, profile, colour, finish, and approved sample in writing before materials are ordered.
A small swatch helps narrow choices; it does not show how thousands of shingles or siding courses will look across a full elevation. Light, viewing distance, shadow, neighboring colours, landscaping, texture, and installation pattern all change the result.

Define the decision before collecting samples
Write down what is changing and what will remain. A roof-only project must work with existing siding. A siding project may need to coordinate with a roof that will remain for another decade. If both are changing, choose a hierarchy rather than comparing every possible pair.
List the fixed elements:
- brick, stone, stucco, or wood that will remain;
- window and door frame colours;
- garage doors, entry doors, shutters, and trim;
- gutters, downspouts, flashing, vents, and metal edges;
- porches, decks, railings, and foundation finishes;
- driveway, walkway, and landscape colours;
- neighbourhood or historic-district requirements;
- homeowners association approvals.
Choose three descriptive goals, such as “warm, low-contrast, and traditional” or “cool, crisp, and simple.” Those words create a filter when two samples look equally attractive in isolation.
Set the technical product requirements separately from colour. Wind rating, fire classification, impact performance, warranty, climate suitability, ventilation compatibility, and installation method should be decided with the contractor and manufacturer documents. Do not choose an unsuitable product because its swatch looks perfect.
Ask for the right sample types
Samples can represent different levels of confidence:
- Printed brochure: useful for initial screening, but printing and screen colour are not product standards.
- Small physical chip: shows actual material and finish but may hide variation.
- Full shingle or siding piece: better for texture, edge, profile, and colour blending.
- Multi-piece sample board: shows the relationship among several pieces and tones.
- Installed local project: shows scale and weathering, but only with the owner’s permission and from public areas.
- On-home mockup: provides the strongest comparison before a large order.
Ask whether the sample is current production, a display-only colour, or an older discontinued item. Confirm that the contractor can obtain the selected product in the required quantity and timeframe.
Keep labels with samples. A loose grey shingle or beige siding panel is easy to misidentify after several contractor visits.
Compare colours in real outdoor light
Take samples outside. Indoor showroom light, phone cameras, computer monitors, and printed catalogues can shift colour. Hold or temporarily mount the sample vertically for siding and at a roof-like angle for roofing when the contractor can do so safely.
Check at:
- morning light;
- midday sun;
- late-afternoon warm light;
- bright overcast;
- full shade;
- the front and rear of the house;
- north-, south-, east-, and west-facing walls where relevant.
A colour can appear cooler in shade, brighter in direct sun, or more saturated beside a complementary material. Dark roof colours may read as one large plane from the street, while a blended shingle reveals more variation up close.
View samples from the sidewalk or normal street approach as well as from a few feet away. Texture that feels strong in the hand may disappear at 50 feet. A subtle colour variation can become busy across a broad wall.
Take photos for memory, but return to the physical sample for approval. Automatic white balance, exposure, phone display settings, and image compression change colour.
Judge texture, scale, and pattern
Colour is only one variable. Roof products differ in tab shape, shadow lines, granule blend, thickness, exposure, and edge. Siding differs in lap height, reveal, woodgrain, smoothness, seam, butt-joint detail, panel width, and corner treatment.
Ask the contractor to show how pieces repeat. A single panel does not reveal whether the installed pattern creates obvious vertical lines, repeating patches, or staggered joints. Review manufacturer layout requirements and representative installation photos.
Compare the visual scale with the house. Wide siding can simplify a large elevation but may change the proportions of a small facade. Heavy roof shadow lines may complement substantial stone or compete with delicate trim.
Touch physical samples to understand relief, but do not judge durability by thickness or weight alone. Product construction and performance documentation matter more than an intuitive “solid” feel.
Compare with fixed exterior features
Place samples directly beside, but do not attach them to, the materials that will remain. Avoid comparing across the driveway because distance and reflected light can hide undertones.
Brick and stone
Identify the quiet background tone and the strongest accent. A roof or siding colour does not need to match every fleck; it should relate to one stable tone without making another element look unexpectedly orange, pink, green, or purple.
Windows and trim
Factory window frames are difficult to change. Check whether the proposed siding creates intentional contrast or an almost-match that looks accidental. Include corner boards, soffits, fascia, and garage trim in the comparison.
Metal components
Confirm the colours of gutters, downspouts, drip edge, flashing, vents, pipe boots, and fasteners. Small metal details can form visible lines across a simple palette.
Neighbouring homes and landscape
Look for enough distinction to identify the home without creating an unintended clash. Consider evergreen versus seasonal foliage and whether mature shade changes the exterior for much of the year.
Verify the exact product and batch plan
Record more than the marketing colour name. Your approval should include:
- manufacturer;
- product line and material;
- profile, exposure, width, or shingle style;
- colour and finish name;
- texture or surface option;
- factory-painted versus field-finished status;
- trim, accessory, and fastener colours;
- sample identifier and approval date;
- availability and lead time;
- lot or batch management plan.
Some products intentionally vary across pieces; others can show manufacturing-lot differences. Ask whether the contractor will order the full elevation or project quantity together, mix bundles or panels as directed, and check labels before installation.
Ask what happens if additional material is needed later. Exact replacement colour may not be guaranteed after weathering or a production change. Keeping properly labeled spare pieces can help with future repairs when the manufacturer permits storage.
Build a useful mockup
For a large or high-cost project, ask for a temporary mockup using several roofing pieces, siding courses, trim, and one representative transition. The contractor should mount it safely without damaging the weather barrier or finished exterior.
A useful mockup is large enough to show:
- pattern repeat and colour blend;
- siding reveal and joint placement;
- corner, window, or door trim relationship;
- roof-to-wall or soffit transition;
- flashing and metal colour;
- how shadows change across the profile.
Review it from normal viewing points and in several light conditions. Include every decision maker before approval. A mockup has little value if one owner sees it only in a photograph.
Do not confuse the appearance mockup with a technical water test or code inspection. The contractor must still follow manufacturer instructions and building requirements.
Document the final approval
Attach a clear product schedule to the contract or change order. Include the exact product data, accessories, approved physical sample, mockup photos, and which element controls if a document conflicts.
Write how substitutions will be handled. “Comparable colour” gives too much room when appearance matters. Require written homeowner approval before a substitute product, line, finish, profile, or colour is ordered or installed.
Confirm responsibility for homeowners association, architectural review, historic district, or permit colour approvals. Submit the exact manufacturer documentation rather than a generic colour description. Save the approval with the project file.
Ask about deposit timing, special-order returns, restocking fees, cancellation, and damaged-material replacement before the order becomes nonreturnable. Contract and consumer-protection rules vary by state, so obtain local guidance for a dispute.
Verify materials when they arrive
Let the contractor control delivery and staging. From a safe released area, compare package labels with the approved schedule before materials are opened and distributed.
Check:
- manufacturer, line, profile, colour, and quantity;
- lot or batch information;
- visible shipping damage, wet packaging, or bent panels;
- accessory and trim colours;
- whether mixed bundles or cartons belong to the same approved product;
- where the approved sample is stored for crew reference.
Photograph labels and pallet condition. If something differs, pause through the contractor before installation. Once special-order material is installed, an appearance dispute becomes far more disruptive.
Avoid common sample mistakes
- Approving from a phone screen or brochure only.
- Viewing one small chip in a showroom.
- Ignoring the rear and shaded sides of the house.
- Comparing roof colour without siding, brick, trim, and metal.
- Choosing technical performance and colour as one decision.
- Losing labels or mixing samples between product lines.
- Assuming all pieces will match one swatch exactly.
- Skipping accessory, flashing, soffit, and gutter colours.
- Approving a name such as “charcoal” without exact product data.
- Allowing substitutions without written review.
- Waiting until installation day to inspect package labels.
Sample comparison checklist
- List fixed exterior materials and design goals.
- Confirm technical product requirements first.
- Collect labeled physical samples and larger boards.
- View each sample outside on multiple elevations.
- Check morning, midday, evening, overcast, and shade.
- Compare from close range and the street.
- Review colour, texture, profile, scale, and pattern repeat.
- Build a mockup for a large or mixed-material project.
- Record the exact product and accessory schedule.
- Require written substitution approval.
- Verify package labels before installation.
Frequently asked questions
Can I trust the colour on a manufacturer website?
Use it to narrow options, not for final approval. Screens and photography vary. Review current physical samples outdoors and an installed example or mockup when possible.
Should the roof match the siding?
They do not need to be identical. Aim for a deliberate relationship in undertone, contrast, scale, and visual weight with all fixed exterior elements.
Why does the sample look different on each wall?
Orientation, shade, reflected light, landscaping, and nearby materials change perception. That is why every major elevation should be reviewed.
Do all shingles in one colour look the same?
Many products include intentional blends and natural granule variation. Review a multi-piece sample and confirm the manufacturer’s bundle-mixing instructions.
What if the delivered colour differs from the sample?
Stop before installation, compare exact labels and product data, and contact the contractor and manufacturer. Do not approve a substitute based only on a similar name.
Should I keep spare materials?
Ask the contractor and manufacturer. Properly labeled spare shingles, siding pieces, and trim can help future repairs, but they need suitable safe storage and may weather differently.
Next steps
Narrow the choice to three physical options. Label each one, place it beside fixed exterior materials, and photograph it on every major elevation in morning, midday, and evening light. Select the exact product only after reviewing texture and pattern at distance, then attach the full product and accessory schedule to the written agreement.



 Guaillas Roofing INC5.0 (14 reviews)
 FBI Supply outlet4.0 (17 reviews)
 Bogert Builders5.0 (6 reviews)
 Woods Roofing and Remodeling5.0 (3 reviews)
 Eddie Cains Gutter Services LLC5.0 (22 reviews)
 BF Construction4.0 (221 reviews)
 The Best Time of Year to Replace Your Roof: Expert Advice
 Top 10 Signs Your Roof Needs Immediate Repair: Protect Your Home
 Siding Moisture Barriers & House Wrap: What Homeowners Should Know
 How Roofs Age: What Changes After 5, 10, 20 Years | Total Roofing Hub
 The Average Lifespan of Asphalt Shingle Roofs
 The Complete Guide to Metal Roofing Systems – Types, Benefits, and Costs