
Siding Utility Penetrations: Flashing, Blocks, and Sealant
On this page
- Quick answer
- Inventory every penetration
- Check mounting blocks and clearances
- Ask what manages hidden water
- Use sealant only in designed joints
- Assign trade responsibility
- Put the repair sequence in writing
- Monitor after repair
- Limits and important notes
- Frequently asked questions
- Sources and evidence notes
- Conclusion and next steps
Quick answer
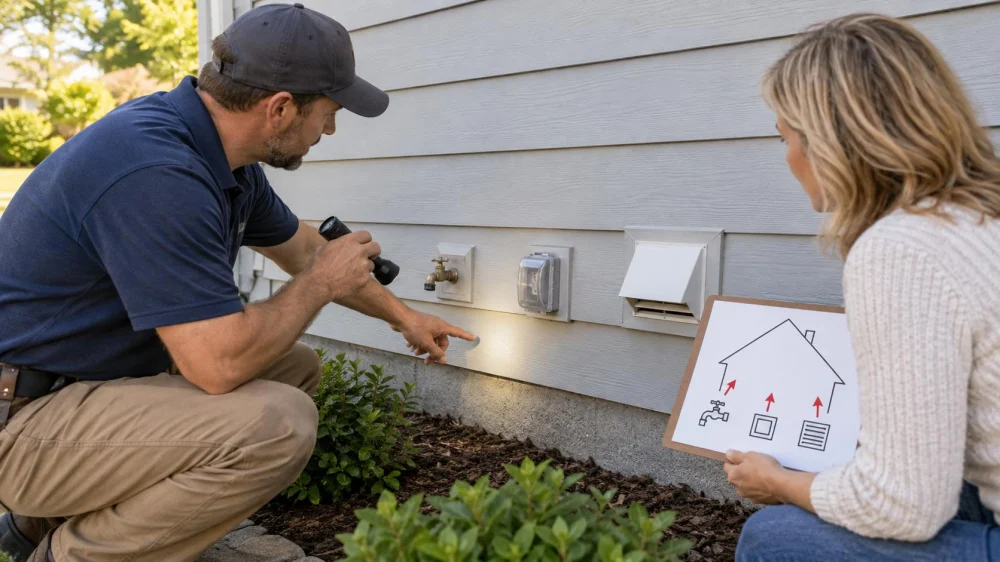
For siding utility penetrations, inspect from the ground for loose mounting blocks, cracked joints, gaps, staining, insect entry, crushed siding, and sealant that blocks drainage. Do not open electrical, gas, refrigerant, or service equipment. Ask the siding contractor and relevant licensed trade to define who disconnects, flashes, mounts, seals, tests, and reconnects each item. The repair should manage water behind the cladding, preserve movement and drainage, follow product instructions, and document concealed conditions.

Inventory every penetration
Walk each exterior wall and map hose bibs, outlets, lights, vents, pipes, cables, meters, service entries, cameras, awnings, railings, and equipment brackets. Note additions that may have been installed after the siding.
Photograph the whole wall and a closer ground-level view. Do not touch damaged electrical covers, smell or test suspected gas leaks, or disturb insect nests; use the appropriate emergency or licensed service.

Rivera Family Roofing & Remodeling
East HanoverMorris CountyNew Jersey
388 NJ-10, East Hanover, NJ 07936, USA
Check mounting blocks and clearances
A purpose-designed block can provide a flat attachment surface and integrate with the cladding. It must suit the siding profile, accessory, weather exposure, and manufacturer's system. A block should not crush panels or prevent required movement.
Ask how the block is fastened to structure, how its top and sides shed water, whether the bottom drains, and how the utility component is supported independently.
Ask what manages hidden water
Exterior cladding is not the only water-control layer. Flashing and the water-resistive barrier behind siding should direct incidental water outward around openings and penetrations. Surface sealant cannot compensate for missing or reversed concealed details.
Request photos before the area is covered. If staining, rot, corrosion, or damaged sheathing appears, pause and define assessment, drying, replacement, and any permit needs.
Use sealant only in designed joints
- Confirm the siding and accessory manufacturer permits sealant at that joint.
- Use compatible primer, backer, joint size, and product.
- Prepare clean, dry surfaces.
- Allow required panel movement.
- Do not seal intentional weep holes or bottom drainage paths.
- Set an inspection and replacement plan because sealant ages.
Assign trade responsibility
Siding crews may not be authorized to disconnect or alter electrical, gas, plumbing, HVAC, telecom, or utility-owned equipment. Name the qualified trade for each task and coordinate timing before siding removal.
Define shutdown, permit, inspection, reconnection, functional testing, and weatherproofing responsibility. The person who moves a component and the person who integrates flashing may be different.
Put the repair sequence in writing
- Protect occupants, utilities, landscaping, and interior finishes.
- Arrange authorized disconnection if required.
- Remove cladding far enough to inspect the assembly.
- Repair substrate and water-control layers.
- Install compatible flashing and mounting support.
- Reinstall cladding with movement clearances.
- Reconnect, test, photograph, and close permits.
Monitor after repair
Inspect after wind-driven rain and seasonal temperature changes from accessible areas. Look for staining, movement, cracked sealant, loose covers, insect activity, or indoor moisture near the penetration.
Do not spray high-pressure water at the detail as an improvised test. Ask the contractor whether controlled testing is appropriate and who will perform it without forcing water into the wall.
Limits and important notes
Details vary by siding material, wall assembly, climate, exposure, utility, accessory, and manufacturer. A visually neat bead of sealant does not prove the concealed flashing is correct.
This is general US homeowner guidance, not electrical, gas, plumbing, HVAC, engineering, or siding repair instruction. Qualified trades, utilities, codes, permits, product instructions, and actual wall conditions govern the work.
Frequently asked questions
Should every gap around a penetration be caulked?
No. Some gaps allow movement or drainage. Follow the designed detail and product instructions.
Can a siding contractor move an outlet or meter?
Not necessarily. Licensed trades and the utility may be required. Assign the work before demolition.
Why request photos behind the siding?
They document flashing, barrier integration, support, and hidden damage that cannot be reviewed after closure.
Sources and evidence notes
This article applies general exterior-wall drainage, flashing, cladding movement, sealant, utility coordination, and contractor-documentation principles. Applicable codes, utility rules, manufacturer details, permits, qualified trades, and the actual wall assembly determine a specific repair.
Conclusion and next steps
Map every penetration and photograph accessible clues before work. Ask how each component connects to structure and the hidden water-control layer. Assign licensed trade roles, preserve drainage and movement, and collect concealed-work photos plus test and permit records.






 Martin & Sons Roof Repair4.0 (35 reviews)
 Rivera Family Roofing & Remodeling4.0 (46 reviews)
 Midpoint Roofing5.0 (101 reviews)
 Aura Home Exteriors5.0 (93 reviews)
 Nivelo Construction LLC4.0 (27 reviews)
 Double D Construction4.0 (193 reviews)
 Roof Valley Repair: Define Materials, Debris, and Water Path
 Siding Utility Penetrations: Flashing, Blocks, and Sealant
 Roof Project Neighbor Plan: Debris, Access, and Boundaries
 Roof Vent Replacement: Match Opening and Flashing
 Roof Recurrence Log: Track Weather, Timing, and Clues
 Roof Repair Estimate: Compare Scope, Not Price Alone