
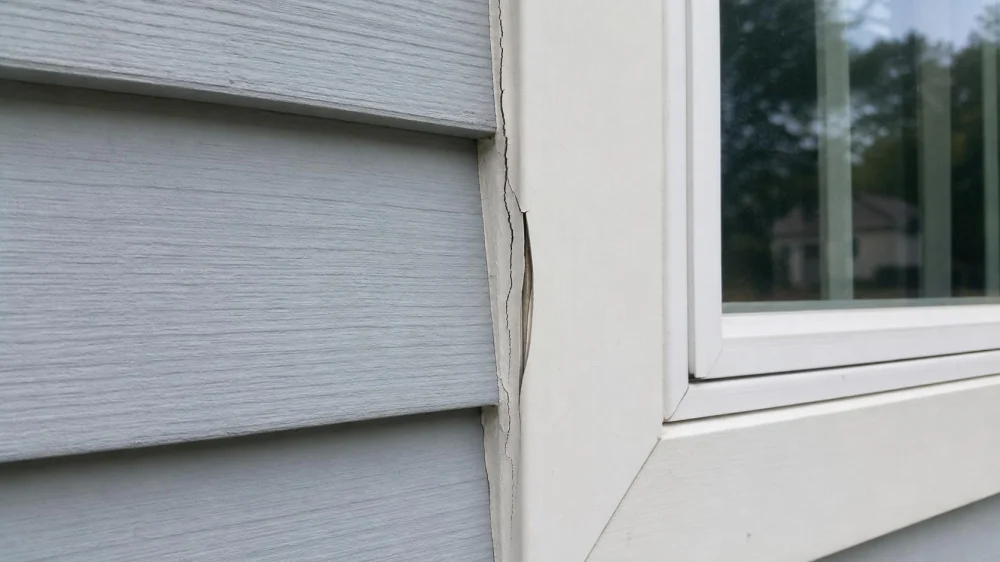
Why Siding Caulk Cracks Around Windows and Doors
On this page
- Quick answer
- What exterior sealant is supposed to do
- Why siding caulk cracks or separates
- Safe inspection checklist
- Clues that water may be getting inside
- Why adding more caulk can make things worse
- What a durable professional repair should address
- Urgent signs, limitations, and evidence notes
- Frequently asked questions
- Conclusion and next steps
Quick answer
Siding caulk cracks when the joint moves more than the sealant can handle, adhesion fails, the bead has the wrong shape, surfaces were dirty or wet, the product is incompatible, or surrounding materials are damaged. Photograph the joint from safe ground, check whether it is an intended sealed joint, look for interior moisture, and have recurring gaps assessed before scraping or covering them with another layer.

Premium Roofing Systems
Costa MesaOrange CountyCalifornia
2054 Continental Ave, Costa Mesa, CA 92627, USA
What exterior sealant is supposed to do
Exterior sealant is a flexible material used at selected joints to limit water and air entry while accommodating some movement. Around windows and doors, it may appear where trim meets siding, at frame perimeters, at certain flashing transitions, and at manufacturer-specified joints.
Sealant is not the only water-control layer. A durable wall also depends on flashing, drainage planes, weather-resistive barriers, correctly lapped components, weep paths, head flashings, sill details, and product clearances.
Not every visible gap should be caulked. Some siding profiles and window systems require open drainage or ventilation paths. Sealing a weep hole, bottom edge, or designed outlet can trap water. Product instructions and the wall assembly determine where sealant belongs.
Why siding caulk cracks or separates
- Normal movement: Vinyl, fibre cement, wood, engineered wood, metal, trim, and window frames expand and contract differently with temperature and moisture.
- Joint too wide, narrow, or deep: Bead geometry affects how sealant stretches. Deep three-sided adhesion can concentrate stress if proper backing was not used.
- Poor surface preparation: Dust, chalk, loose paint, old sealant, moisture, oil, and release agents can prevent adhesion.
- Wrong or incompatible product: A sealant may not bond to the specific siding, coating, flashing, masonry, metal, glass, or plastic.
- Installation conditions: Temperature, rain, frost, direct sun, joint moisture, tooling, cure time, and bead size can affect performance.
- Ultraviolet and weather exposure: Sun, heat, cold, precipitation, and pollutants can harden, shrink, or degrade material over time.
- Building or component movement: Loose trim, window movement, settling, swelling wood, fastening problems, or structural change can exceed sealant capacity.
- Water behind the joint: Hidden leakage can push, stain, or release sealant from the substrate.
- Paint interaction: Paint may crack over a flexible bead even when the sealant below still moves, or an unsuitable coating may affect adhesion.
Safe inspection checklist
- Use safe weather and ground. Avoid ladders, wet surfaces, high wind, ice, and overhead electrical lines.
- Map the joint. Note top, sides, sill, trim corners, siding transitions, and nearby penetrations.
- Describe the failure. Is the bead split through the middle, pulled from one side, missing, hard, soft, stained, bubbled, or painted over?
- Compare elevations. Does cracking occur on one sunny wall, every opening, only new work, or one moving component?
- Look above first. Water may originate at a head flashing, roof-to-wall intersection, gutter, light, vent, or upper opening.
- Check drainage features. Photograph weep holes and open bottom details without plugging them.
- Review records. Find siding, window, sealant, paint, installation, and warranty documents.
- Track change. Take dated close and wide photographs without inserting tools into the gap.
Do not pull on siding, probe soft wood, remove trim, or peel a bead merely to see what is behind it. Opening the joint can release water, damage finishes, and destroy evidence needed for warranty or leak tracing.
Clues that water may be getting inside
Exterior clues include staining below corners, peeling or bubbling paint, swollen trim, soft-looking wood, rust, efflorescence on masonry, repeated sealant failure, and algae or dirt patterns that follow water.
Inside, look for staining around the same opening, damp odour, swollen casing, peeling paint, soft drywall, wet flooring, condensation between panes, and changes after wind-driven rain. Water can travel within a wall, so the indoor spot may not align directly with the cracked bead.
A hose test can force water into places ordinary rain would not reach and can create damage. Professional testing uses controlled methods, observation, and staged wetting; do not spray high-pressure water at siding joints.
Seek broader investigation when gaps recur quickly, trim moves, the opening is difficult to operate, or the wall shows distortion. Sealant failure may be a symptom of movement or hidden water management problems.
Why adding more caulk can make things worse
New sealant does not reliably bond to dirty, loose, weathered, painted, or incompatible old material. A thick cap can trap moisture, hide failed flashing, bridge a drainage opening, and create an unattractive joint that still tears.
A durable joint generally requires identifying the intended design, removing failed material without damaging substrates, cleaning and drying surfaces, choosing a compatible sealant and primer, using backing where required, forming the correct bead, tooling it properly, and allowing cure under suitable conditions.
Do not use interior painter's caulk outdoors, fill weep holes, seal the bottom of every siding course, or assume “more” sealant means better water resistance. Do not work above safe reach without suitable training and access equipment.
What a durable professional repair should address
- Identify siding, trim, window, flashing, coating, and existing sealant materials.
- Confirm which joints should be sealed and which must drain.
- Trace water from components above and around the opening.
- Assess movement, fastening, substrate condition, clearances, and joint width.
- Remove failed material and repair damaged trim, flashing, or backing before resealing.
- Select compatible primer, backing, sealant, and paint system using manufacturer guidance.
- Install the correct joint profile and cure it under acceptable conditions.
- Document concealed findings, materials, photos, test results, and warranty.
A siding contractor may handle cladding and trim, while a window specialist addresses frame and flashing integration. Hidden framing or wall damage may require a building-envelope, carpentry, or structural professional.
Urgent signs, limitations, and evidence notes
Arrange prompt help for active indoor leakage, soft or falling trim, a window or door shifting in its opening, water near electricity, widespread wall movement, or a rapidly growing stain. Keep people away from loose overhead components and wet electrical areas.
This article reflects common exterior sealant and water-management practice in the United States. A photograph cannot confirm sealant chemistry, hidden flashing, drainage-plane laps, substrate moisture, structural movement, or the intended joint design.
Follow the siding, window, flashing, sealant, and coating manufacturers' current instructions. Building codes, permits, contractor rules, and warranty procedures vary by state, municipality, building type, and project scope.
Frequently asked questions
Is cracked caulk around a window always a leak?
No. The wall may still shed water through flashing and drainage layers, but the crack deserves assessment because it can also be part of the intended exterior seal.
Can I caulk over the old bead?
Usually a durable repair requires removal of failed material and preparation of clean compatible surfaces. A cap over loose sealant often fails again and can hide the cause.
Should the bottom of window trim be sealed?
It depends on the window, trim, siding, and flashing design. Some bottom details must drain. Follow the specific installation instructions rather than sealing every visible gap.
Why does the same corner keep cracking?
Repeated failure can indicate concentrated movement, loose trim, poor joint geometry, incompatible materials, water behind the bead, or a flashing and installation issue. Correct the cause before resealing.
Does paintable sealant need paint?
Some products are designed to be painted and others are not. Paint timing and compatibility matter. Use the sealant and coating manufacturers' instructions for the exact products.
Conclusion and next steps
Photograph the crack and surrounding opening, determine whether the joint is intended to be sealed, check for water clues inside and above, and review product records. Do not cover old sealant or block drainage paths. A durable repair connects compatible materials, correct bead geometry, sound substrates, flashing, and controlled water drainage—not just a fresh surface line.



 Wood Trades LLC4.0 (7 reviews)
 VistaSafe Roof Solutions5.0 (1 reviews)
 North Central Building Solutions4.0 (91 reviews)
 Donewell Services LLC5.0 (5 reviews)
 Jim Litsinger Roofing0.0 (0 reviews)
 Hector Jimenez Roofing5.0 (2 reviews)
 Step-by-Step Guide to Planning a Roof Replacement Project
 The Complete Guide to Metal Roofing Systems
 What Every Homeowner Should Know About Roofing Materials Guide
 Siding Repair Tools & Materials Cost Guide: Save on Your Home Renovation
 How to Choose Roof Material Based on Snow Load
 Energy Rebates & Tax Credits for Roofing and Siding Upgrades: Save Money on Home Improvements