
Window and Siding Replacement: Sequence Flashing First
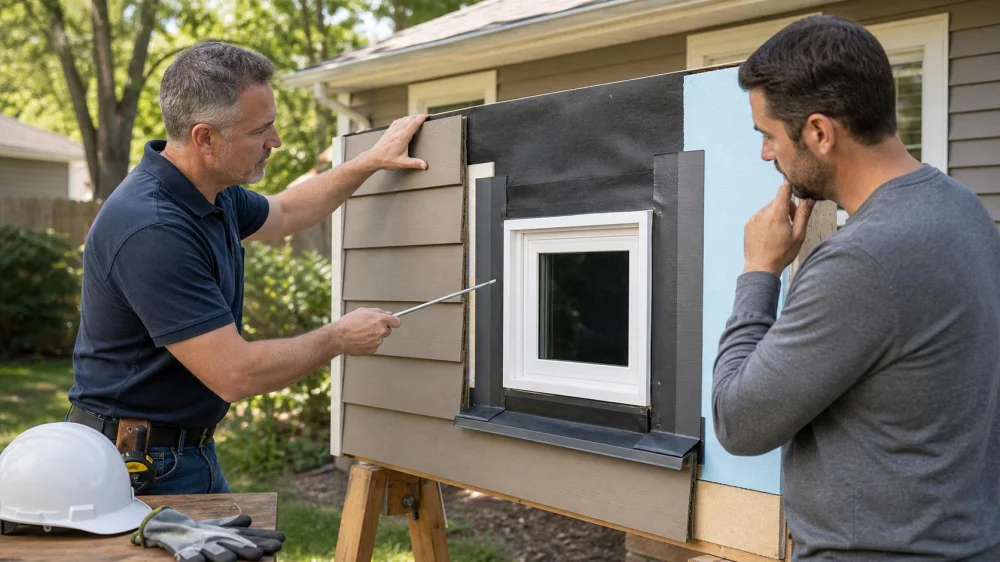
Replacing windows and siding in one project creates a valuable chance to connect the window flashing to the wall’s water-resistive barrier. It also creates a coordination risk: if each trade treats the trim line as the end of its responsibility, hidden gaps or reverse laps can remain. Define the opening, drainage plane, insulation, trim, and inspections before demolition.
Quick answer
Decide whether each window is an insert or full-frame replacement and identify the wall’s actual drainage plane. Specify sill pan, side and head flashing, water-resistive barrier repairs, insulation, interior air seal, head flashing, siding clearance, and trim. Assign one coordinator across window and siding crews. Inspect and photograph the complete flashing connection before exterior trim and siding hide it.

Universal Windows Direct of Syracuse
SyracuseOnondaga CountyNew York
311 Gordon Ave, Syracuse, NY 13211, USA
Choose full-frame or insert scope
An insert replacement fits a new unit within a retained frame. It can limit exterior disturbance but may reduce glass area and leave old flashing or concealed frame conditions inaccessible. A full-frame replacement removes the old unit to the rough opening, allowing inspection and new flashing but requiring more trim and finish work.
Do not choose only on price. Review frame condition, leak history, sill slope, rot, wall depth, exterior insulation, desired opening size, egress or safety requirements, and whether the current drainage-plane connection can be evaluated.
List the chosen method for every opening. Bay, bow, mulled, basement, door-adjacent, masonry, and roof-intersection windows may need separate details.
Map the water path
Siding is not the only water-control layer. Rain that gets behind cladding should meet a continuous water-resistive barrier and drain back outside. Windows interrupt that layer, so sill, jamb, and head flashing must connect to it in a shingle-like sequence.
The U.S. Department of Energy’s Building Science Education guidance describes a sill pan, side flashing over the pan, head flashing over the sides, and integration with the wall drainage plane.
Interior air sealing serves a different purpose from exterior drainage. Spray foam or sealant around the interior perimeter does not replace an exterior sill pan or properly lapped flashing.
Set the work sequence
- Survey each opening, wall layer, utility, and interior finish.
- Protect interiors and establish weather limits and temporary closure plans.
- Remove siding and trim far enough to expose the needed drainage-plane connection.
- Remove the window according to its scope and document the rough opening.
- Repair framing, sheathing, and water-resistive barrier through approved changes.
- Install sill support and pan flashing, then the window, jamb flashing, and head flashing in the specified order.
- Complete exterior drainage and interior air-seal details.
- Inspect and photograph before trim, insulation covers, and siding conceal the layers.
- Install cladding, clearances, head trim flashing, and interior finishes.
- Perform functional, drainage, and final finish checks.
The exact order varies by assembly and product; the important point is to approve it before crews arrive.
Assign trade responsibility
Use a responsibility matrix for window removal, rough-opening repair, structural changes, sill pan, flashing tape, liquid flashing, water-resistive barrier patching, exterior insulation, furring, head flashing, siding, interior air seal, casing, paint, disposal, permits, and inspections.
Name the person who decides whether a substrate is ready and who can authorize a change. If the window installer finishes before the siding crew returns, define temporary weather protection and its inspection.
Require compatible products. Sealants, flashing tapes, housewraps, fluid-applied barriers, foams, treated wood, metal, and window coatings can interact. “Use standard materials” is not a compatibility review.
Coordinate dimensions and trim
New siding thickness, exterior insulation, furring, trim width, window projection, and drainage gap can shift the face of the wall. Confirm whether the window sits at sheathing, insulation, or another plane and how the sill extends beyond the finished cladding.
Mock up one representative opening when the project changes wall thickness. Check the head, jamb, sill, casing, screens, shutters, blinds, security sensors, and interior stool. Verify that operable units open fully and that egress, tempered glazing, fall protection, and accessibility requirements are addressed where applicable.
Colour and profile matching should be approved with physical samples. Do not let trim aesthetics force a water detail into a reverse lap or blocked drainage path.
Inspect before siding conceals the work
Photograph:
- the exposed rough opening and any damage;
- repaired sheathing and framing;
- sill pan with end dams or designed corners;
- window support and fastener locations;
- jamb and head flashing laps;
- connection to the water-resistive barrier;
- head trim flashing and siding clearance;
- interior air seal before casing;
- final operation, locks, screens, and finishes.
Controlled water testing may be useful when specified and conducted by qualified people under an agreed protocol. Randomly spraying a high-pressure hose can force water where normal rain would not.
Code, product, and safety limits
Window installation and flashing vary with product, wall type, climate, wind exposure, exterior insulation, cladding, adopted code, and manufacturer instructions. Structural openings, masonry, stucco, high-rise walls, and known leaks may need design professionals or specialists.
This article is planning information, not an installation detail. Homeowners should stay clear of demolition, open walls, lifts, scaffolds, ladders, glass, and temporarily unsecured openings. Qualified crews must manage fall protection, lead or asbestos hazards, weather protection, and electrical or alarm systems.
Frequently asked questions
Should windows or siding be replaced first?
When both are planned, coordinate them as one enclosure sequence. Windows and flashing typically need to be integrated before final siding closes the wall.
Can insert windows be installed without removing siding?
Often they can, but the retained frame and existing flashing remain. Confirm that this scope fits the condition and performance goal.
Does exterior caulk make the window waterproof?
Sealant can support a designed joint, but it does not replace a sill pan, lapped flashing, or a continuous drainage plane.
Who fixes rot found at the opening?
The contract should assign assessment, pricing, authorization, and repair. Document hidden conditions before covering them.
Next steps
Inventory every window and choose insert or full-frame scope. Ask bidders to draw the opening, drainage plane, flashing, insulation, trim, and finished cladding. Assign responsibility across trades and include a hidden-work inspection. Approve one mock-up before repeating the detail around the house.






 Roofing Windows and Siding by 2B Development4.0 (10 reviews)
 Matrix Roofing4.0 (21 reviews)
 Boomhower Construction & Remodeling INC5.0 (1 reviews)
 Latin roofing siding llc1.0 (1 reviews)
 RADCO Renovation and Development Company, LLC0.0 (0 reviews)
 Atlantic Exteriors4.0 (63 reviews)
 How to Prevent Roof Damage from Strong Winds
 Loose Siding After Wind: Safe Checks and Repair Questions
 What’s the Best Time of Year to Replace Your Roof? Expert Seasonal Guide
 What to Expect During a Roof Inspection
 What to Know About Roof Replacement During Real Estate Sale: Key Insights
 Siding Repair for Extreme Climates: Protect Your Home from Cold, Heat, Snow, and Humidity