
Housewrap Behind Siding: What It Does and What to Ask
On this page
Quick answer
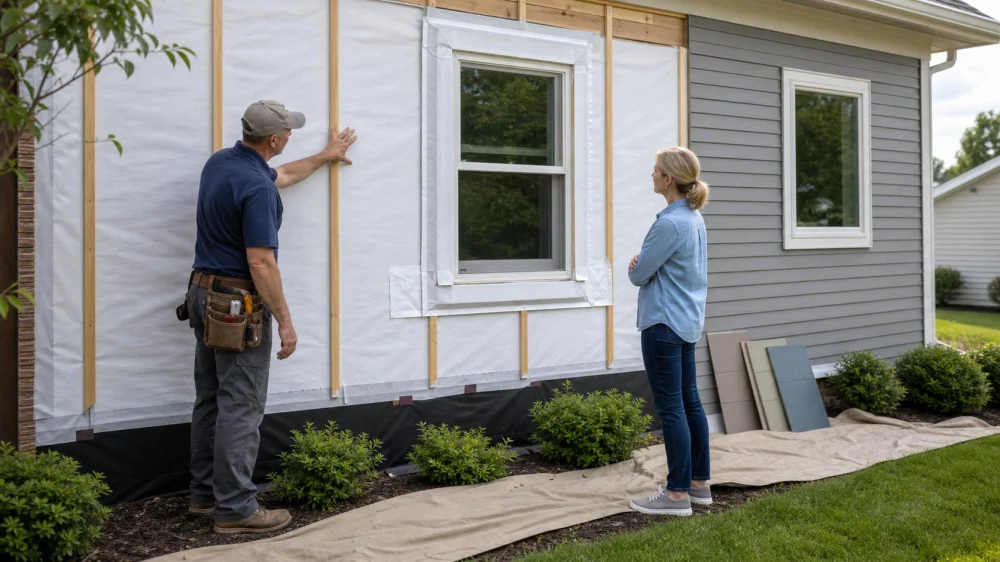
Housewrap is one possible material used as a water-resistive barrier behind siding. Its job is to help drain rain that passes the cladding away from the wall sheathing. It works only as part of a connected system: seams, laps, fasteners, windows, doors, penetrations, and flashing must direct water outward. Before new siding covers it, ask how every transition is detailed and documented.
This guide is for U.S. homeowners planning siding work or reviewing an exposed wall during re-siding. The correct assembly depends on climate, existing construction, cladding, local code, manufacturer instructions, and project design.
What housewrap is
Housewrap is a sheet building material installed behind exterior cladding. It is commonly used as a water-resistive barrier, often shortened to WRB. The broader category can also include building paper, certain membranes, liquid-applied products, or approved sheathing systems with sealed joints.
The WRB is not the siding and should not be treated as a permanently exposed exterior finish. Siding reduces direct weather exposure and provides appearance, while the water-control layer behind it manages rain that reaches the back of the cladding.
Some housewrap assemblies may also serve as an air-control layer when seams, edges, and penetrations are sealed as part of a continuous design. “May” matters: installing a sheet on most of the wall does not automatically create a complete air barrier. Ask which functions the project design assigns to each layer.

D&D Contracting
14425 Falcon Head Blvd Building E Suite 100, Austin, TX 78738, USA
How the wall manages rain
A wall should give incidental water a continuous route down and out. This is often called the drainage plane. The concept depends on connections more than any single product.
- Upper layers overlap lower layers so water remains on the exterior side as it moves downward.
- Window and door flashing integrates with the WRB rather than becoming an isolated patch.
- Penetrations are detailed around vents, pipes, wires, hose connections, lights, and mounting blocks.
- Openings at the bottom can drain instead of being sealed in a way that traps water.
- Fasteners and repairs follow the approved system so holes and tears are handled consistently.
- A drainage or ventilation gap is included when the assembly requires one.
Think of each opening as a transition in the water path. A large uninterrupted area of housewrap can look tidy while a reversed lap or incomplete window corner creates a vulnerable route.
What to check during re-siding
- Identify the existing layers. Ask the contractor to note the cladding, drainage space, WRB, sheathing, exterior insulation, and visible flashing before deciding what stays.
- Inspect for moisture damage. Staining, swelling, softness, corrosion, decay, insect damage, or previous patches should be evaluated before being covered.
- Find the source. Replacing damaged sheathing without correcting the entry path can repeat the problem.
- Confirm compatibility. New wrap, tapes, sealants, membranes, flashing, foam, and siding should work together and follow their manufacturers' instructions.
- Review openings and penetrations. Windows, doors, roof-wall intersections, decks, meters, faucets, exhausts, and cables require project-specific details.
- Document the completed layer. Take labelled overview and detail photos before siding hides the work.
Homeowners can observe from a safe location and ask for records. Do not climb scaffolding, enter crew-only zones, peel back installed materials, or interrupt a weather-sensitive sequence to take a closer photo.
Questions for your contractor
- What material serves as the water-resistive barrier in the proposed wall?
- Will the existing WRB be retained, repaired, overlaid, or replaced, and why?
- How will seams, tears, fasteners, corners, and top and bottom edges be handled?
- How does the WRB connect to window, door, deck, roof, and foundation flashing?
- Which tape, sealant, flashing, or accessory products are approved with the selected system?
- Does the siding assembly require furring, a drainage mat, ventilation openings, or insect screening?
- How will hidden damage be documented, priced, and approved before repair?
- Which inspections are required, and what must remain exposed for them?
- What photos, product information, and warranties will be included at handover?
Ask for a wall-section sketch or manufacturer detail when a verbal explanation becomes confusing. The drawing should show the direction of laps and the path water takes at a representative window, bottom edge, and roof-wall junction.
When damage is found
Pause covering work in the affected area long enough for qualified evaluation. Record the location, extent, material condition, and likely entry path without assuming the first visible defect is the only cause.
A useful written change includes removal limits, replacement materials, drying or remediation requirements, flashing correction, added price, schedule effect, inspection needs, and warranty impact. Structural decay, widespread moisture, suspected mould, insects, or damage near electrical components may require another trade or design professional.
Temporary weather protection may be necessary while the issue is evaluated. The temporary step should shed water safely and remain distinct from the permanent repair. Ask who monitors it and what conditions trigger an urgent return visit.
Limits and important notes
Housewrap is not a universal synonym for waterproofing, insulation, vapour control, or air sealing. These layers manage different forms of heat, air, liquid water, and water vapour, though one approved product can sometimes perform more than one function within a designed assembly.
More tape is not automatically better. Taping a drainage opening, using incompatible sealant, or reversing a lap can interfere with intended water movement. Follow the product system, cladding instructions, approved details, and local requirements.
Existing walls are especially variable. Older homes may use building paper, board sheathing, masonry, stucco, or assemblies that behave differently from current new construction. A generic online diagram cannot replace an on-site assessment for a specific wall.
Wind, wildfire, coastal exposure, heavy rain, cold climates, pests, and flood risk may add design requirements. Check local code and obtain qualified building-science, engineering, or architectural advice when the project includes unusual exposure or damage.
Frequently asked questions
Is housewrap waterproof?
It is better understood as part of a water-resistive drainage system, not a standalone waterproof enclosure. Performance depends on exposure limits, laps, seams, flashing, penetrations, and compatible installation.
Can new siding go over old housewrap?
Sometimes an existing layer may be retained or repaired, but the decision depends on its condition, continuity, compatibility, code status, and integration with new details. Ask the project professional to document the assessment.
Should every house have a gap behind siding?
Assembly requirements vary. Some claddings and climates use furring, drainage mats, or textured products to create drainage and drying space. Follow the designed wall system and manufacturer instructions.
Can I inspect the WRB after siding is installed?
Most of it will be concealed. Arrange progress photos and required inspections before covering. Later destructive investigation should be targeted and performed by qualified people when a problem justifies it.
Does housewrap replace flashing?
No. The WRB and flashing must be integrated. Flashing handles transitions and openings so water is directed onto the drainage plane and outward, rather than behind it.
Sources and evidence notes
This guide follows building-science water-management principles: cladding is not assumed to stop every drop, the wall needs a continuous drainage plane, and the WRB must integrate with flashing. The U.S. Department of Energy's Building Science Education resource explains housewrap as a water-resistive barrier and drainage plane. The Building America Solution Center provides further guidance on drainage planes behind exterior cladding. Project documents, code, and manufacturer instructions control the actual installation.
Next steps
Ask the siding contractor to identify the proposed WRB and draw how it connects at one window, one penetration, the wall bottom, and any roof-wall junction. Agree on hidden-damage handling and progress photos before removal begins. Review the exposed wall and official inspection needs before new siding conceals the drainage layer.


 Franks Brothers Construction3.0 (6 reviews)
 Mister ReRoof5.0 (3 reviews)
 Reyes Roofing Contractor5.0 (44 reviews)
 Stump Siding & Roofing, LLC4.0 (11 reviews)
 Mike Fink Construction2.0 (2 reviews)
 Top Dog Roofing4.0 (59 reviews)
 How to Spot Hail Damage on Your Roof: Essential Guide for Homeowners
 How to Handle Black Streaks on Your Roof or Siding: A Comprehensive Guide
 How to Budget for a Roof Replacement Project: A Complete Guide
 How to Repair Roof Flashing Around Skylights & Vents: A Complete Guide
 How to Secure the Best Roofing Deals Without Sacrificing Quality
 Best Ways to Inspect Your Siding After Summer Storms