
Roof Kick-Out Flashing: Signs Water May Miss the Gutter
Table of contents
Quick answer
Kick-out flashing is a shaped diverter at the lower end of a sloped roof where it meets a taller wall. It directs concentrated runoff away from siding and into the gutter. From the ground, homeowners can look for a missing or undersized diverter, staining, rot, loose siding, or water overshooting the gutter, then arrange a coordinated roof-and-wall inspection.

EMPIRE HOME IMPROVEMENT SERVICE LLC
Port ChesterWestchester CountyNew York
48 Clinton St, Port Chester, NY 10573, USA
What kick-out flashing does
At a roof-to-wall intersection, step flashing manages water along the slope. Where that intersection ends at the eave, water needs to turn outward into the gutter rather than continue down the wall. A kick-out flashing—also called a kick-out diverter or roof-wall water deflector—creates that turn.
Department of Energy building-science guidance identifies roof-wall intersections as vulnerable and describes a diverter extending far enough to send runoff safely into the gutter. The visible piece is only part of the assembly. Reliable performance also depends on integration with step flashing, the water-resistive barrier behind the siding, roofing, cladding clearances, gutter position, and drainage below.

RWB Roofing & Construction Inc
1350 N Church St, Hazle Township, PA 18202, USA
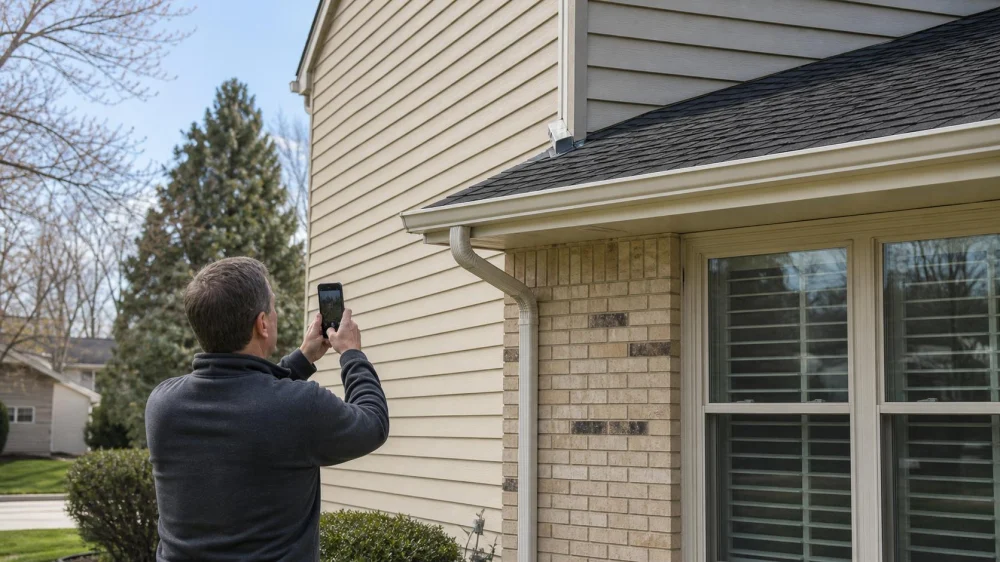
A ground-level inspection
- Choose dry daylight. Stand on firm ground or view from an interior window. Do not climb a ladder or walk on the roof.
- Find roof-wall endings. Look for places where a lower roof slope terminates against a taller exterior wall and gutter.
- Look for the diverter. A small formed piece should direct water away from the wall toward the gutter. Shapes and materials vary, so absence cannot always be confirmed from one angle.
- Check the gutter relationship. Note whether the diverter appears to discharge into the gutter or behind, beside, or beyond it.
- Scan the wall below. Look for dark runoff tracks, green growth, peeling paint, swollen trim, cracked finishes, loose siding, or repeated splash marks.
- Photograph context. Take a wide image showing roof, wall, eave, and gutter, then zoomed images from the same safe position.
- Observe rain only from shelter. During moderate rain, watch through a window or from a protected dry location. Do not stand under runoff, near lightning, or on wet surfaces.
Warning signs around the roof-wall corner
- Runoff streams down the siding instead of entering the gutter
- Water repeatedly overshoots the gutter at the wall end
- A diverter is missing, flattened, detached, cracked, or visibly too short to reach the gutter
- Sealant appears to be the only barrier at the roof-wall termination
- Rust, corrosion, or open joints appear in visible flashing
- Siding, trim, fascia, or sheathing looks stained, swollen, soft, or decayed
- The gutter end cap, hanger, or slope leaves a gap below the discharge point
- Mulch erosion or splash marks concentrate directly below the intersection
These signs do not prove the exact leak path. Water can enter above the visible damage and travel behind cladding. A clogged gutter, missing step flashing, reversed weather-barrier laps, or a window below the roof edge may contribute.
Related signs inside the home
Without opening walls, check the room on the other side and the level below after rain. Record peeling paint, discolored drywall, swollen baseboard, damp carpet edge, musty odor, or moisture around a nearby window. In an accessible attic, inspect only from a safe, floored path with adequate lighting; do not cross exposed joists or disturb insulation simply to reach the area.
Interior stains may appear far from the entry point, and dry weather readings may not reproduce an intermittent leak. Share the rain direction, intensity, timing, and photos with the contractor.
Questions for a roofing or siding contractor
- Is kick-out flashing present, correctly sized, and positioned to discharge into the gutter?
- How is it integrated with the step flashing and wall drainage plane?
- Will siding or trim need limited removal to verify concealed laps and damage?
- Is the gutter correctly positioned, supported, sloped, and sized at this corner?
- Are roofing and siding manufacturer requirements and local codes being followed?
- What wet or deteriorated sheathing, framing, or insulation must be evaluated?
- How will the repair be tested and documented before finishes are reinstalled?
- Who is responsible for roofing, siding, gutter, painting, and interior restoration work?
Ask for photos of concealed conditions after careful removal and again after flashing integration, before the siding covers the work.
Limitations and safety boundaries
This guide supports observation, not design or installation. Roof pitch, wall type, cladding, gutter configuration, climate, manufacturer instructions, and local code affect the correct detail. Do not bend flashing from a ladder, add surface caulk as a substitute for integrated flashing, or drive fasteners into an unknown assembly.
Keep away from overhead power lines, wet roofs, damaged soffits, ice, and unstable ground. A roofing professional should access elevated areas. If water has reached electrical fixtures, wiring, or a sagging ceiling, keep clear and contact the appropriate emergency, electrical, or restoration professional.
Frequently asked questions
Can a gutter alone replace kick-out flashing?
No. The gutter receives runoff, while the diverter turns concentrated flow away from the wall and toward the gutter. Both details must work together.
Should kick-out flashing be visible?
Part of the diverter is commonly visible at the lower end of the roof-wall intersection, but appearance varies. A contractor may need to inspect concealed integration before confirming adequacy.
Can I fix the corner with more caulk?
Surface sealant may temporarily change where water appears, but it can also trap water or hide a failed drainage detail. Integrated flashing and proper laps are the primary water-management strategy.
Who should inspect it: a roofer or siding contractor?
Because the detail joins roofing, wall cladding, weather barrier, and gutter, the best assessment may require both trades or one exterior contractor experienced in the complete assembly.
Sources and evidence
- U.S. Department of Energy Building Science Education: Kick-Out Flashing — purpose and roof-wall drainage integration.
- U.S. Department of Energy: Building America Best Practices, Volume 15 — wall-to-roof flashing and runoff diversion.
- ENERGY STAR: Water Management System Builder Checklist Guide — step and kick-out flashing details.
Conclusion and next steps
Photograph every roof-wall termination from the ground, especially where runoff concentrates beside a gutter. Record staining or overshoot during rain from a protected location. If the diverter appears missing, damaged, or poorly aligned—or if wall damage is present—request a coordinated roofing and siding assessment that verifies the concealed drainage layers before cosmetic repair.






 Franks Brothers Construction3.0 (6 reviews)
 Mister ReRoof5.0 (3 reviews)
 Reyes Roofing Contractor5.0 (44 reviews)
 Stump Siding & Roofing, LLC4.0 (11 reviews)
 Mike Fink Construction2.0 (2 reviews)
 Top Dog Roofing4.0 (59 reviews)
 How to Spot Hail Damage on Your Roof: Essential Guide for Homeowners
 How to Handle Black Streaks on Your Roof or Siding: A Comprehensive Guide
 How to Budget for a Roof Replacement Project: A Complete Guide
 How to Repair Roof Flashing Around Skylights & Vents: A Complete Guide
 How to Secure the Best Roofing Deals Without Sacrificing Quality
 Best Ways to Inspect Your Siding After Summer Storms