
Siding Clearance Above Roofs and Ground: Keep Drainage Paths Open
On this page
Quick answer
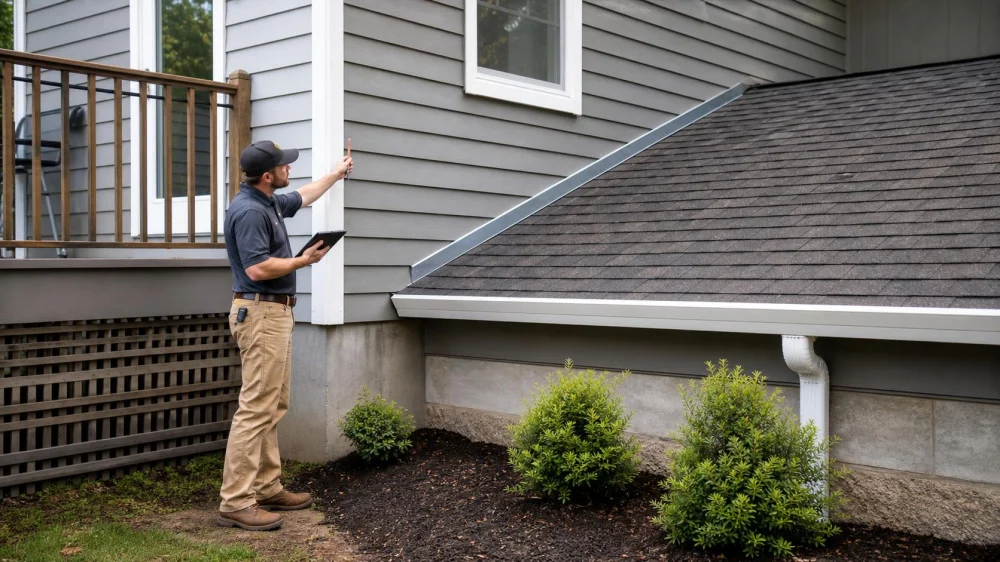
Siding should not be buried in soil, mulch, paving, roofing, or deck surfaces. Required clearance depends on the cladding, manufacturer, code, climate, and adjacent assembly. From the ground, record where panels or trim touch surfaces, stay wet, collect debris, or hide flashing. Do not cut siding or excavate beside the foundation without a plan. Ask a qualified contractor to coordinate clearance, flashing, pest protection, drainage, and finish repairs.

Why it matters
Clearance helps cladding drain and dry, makes flashing visible, reduces capillary moisture and debris buildup, and preserves access for inspection. Changing grade or roof height can erase space that originally existed.
This United States guide applies broadly to homes with siding. Exact dimensions and details differ for vinyl, fiber cement, wood, engineered wood, metal, masonry interfaces, roof slopes, decks, and wildfire or pest zones.

Practical checklist
- Photograph every low-clearance location with a ruler only from safe stable ground.
- Identify siding product and available manufacturer instructions.
- Note soil, mulch, paving, roof, deck, stair, utility, and window-well interfaces.
- Look for staining, softness, swelling, corrosion, insects, blocked weeps, or trapped leaves.
- Confirm whether grade, roof layers, or hardscape were raised during prior work.
- Ask how flashing and the water-resistive barrier will remain continuous.
- Document drainage and landscaping changes so water still moves away from the building.
Step-by-step plan
- Create an exterior map of contact points and moisture symptoms after dry and wet weather.
- Determine the cladding and substrate before selecting clearances or cutting methods.
- Review code and manufacturer details for ground, roof, deck, and horizontal-surface interfaces.
- Investigate concealed damage where symptoms justify opening, with pest or environmental help when needed.
- Coordinate grading, gutter discharge, hardscape, roofing, flashing, and siding rather than moving one item in isolation.
- Repair the drainage plane and cladding with compatible materials and correct fastening.
- Photograph final clearances and inspect after rain, irrigation, snow, and seasonal landscaping.
Keep measurements, dated photos, product labels, instructions, permits, drainage plan, concealed-condition findings, contractor scope, change orders, invoices, and maintenance notes.
Limits and warning signs
One universal clearance number does not fit every material or interface. More space alone cannot correct missing flashing, negative grade, trapped water, or damaged sheathing. Cutting panels can void warranties or expose the wall.
Seek qualified structural, pest, electrical, environmental, or drainage help for severe decay, termites, mould, water near utilities, settlement, or major grading and foundation problems.
Frequently asked questions
Can I just pull mulch away?
That may help visibility, but preserve drainage and erosion control and check whether soil or hardscape remains too high.
Why is siding touching the shingles?
Reroofing layers, original detailing, or settlement may reduce clearance. The roof-wall flashing must be assessed before changes.
Can I trim the bottom edge?
Only with a product-specific repair plan that preserves fastening, flashing, pest control, and warranty.
How often should I check?
Inspect seasonally and after landscaping, reroofing, paving, deck, irrigation, or major storm work.
Sources and evidence
The guide reflects common cladding and building-envelope principles: preserve material-specific clearance, drainage and drying, keep flashing visible, prevent soil and debris contact, and coordinate adjacent assemblies before alteration.
Conclusion and next steps
Map every contact point, identify the siding, and compare the condition with manufacturer and code details. Have one coordinated scope address grade, drainage, flashing, concealed damage, and cladding restoration.


 Uniques siding llc0.0 (0 reviews)
 Onderdonk Roofing5.0 (1 reviews)
 Affordable Seamless Gutters and Screen Enclosures4.0 (32 reviews)
 Caribbean Roofing and Home Remodeling5.0 (18 reviews)
 Perez Roofing Restoration5.0 (20 reviews)
 Shadowcrest Roofing Inc5.0 (24 reviews)
 How Roof Drainage Protects Siding From Damage
 Roof Re-Roofs or Layovers: Pros, Cons & Codes Explained
 How to Avoid Hidden Costs During a Roof Replacement: Essential Tips for Homeowners
 How Often Should You Replace Your Home's Siding?
 How to Repair Roof Flashing Around Skylights & Vents: Step-by-Step Guide
 Everything You Need to Know About Roof Warranties