
- Importance of Corners and Trim in Siding Installation
- Choosing the Right Materials for Corners and Trim
- Steps for Installing Corner Siding
- Installing Trim Finishes for a Polished Look
- Common Mistakes to Avoid During Siding Installation
1. Importance of Corners and Trim in Siding Installation
When it comes to siding installation, corners and trim are often the focal points that can make or break the appearance of your home’s exterior. While the large surfaces of the siding are essential, the details—such as how the siding is installed around corners and along trim—can dramatically impact the final look and durability of your siding. Proper corner and trim installations ensure that the siding is both functional and aesthetically pleasing.

1.1. Aesthetic Appeal
Well-installed corners and trim give your home a clean, cohesive appearance. These elements frame the structure and help highlight architectural features, making your home stand out. When done right, corners and trim can provide a sharp, professional finish, elevating the look of your entire home.

CornerStone Roofing & Restoration
New MilfordBergen CountyNew Jersey
636 Princeton St, New Milford, NJ 07646, USA
1.2. Preventing Water Damage
Properly sealed corners and trim also play a critical role in preventing water infiltration. Water can seep into poorly installed corners and trim, leading to mold, mildew, and rotting of the siding and underlying structure. Ensuring these elements are well-fitted protects your home’s exterior and structural integrity.
2. Choosing the Right Materials for Corners and Trim
Choosing the right materials for your siding corners and trim is essential to achieving a durable and aesthetically pleasing result. Here’s what you need to know when selecting materials for these crucial components:
2.1. Matching Siding Material
For a seamless and harmonious look, it’s essential to choose trim materials that complement your siding. If you’re installing vinyl siding, opt for vinyl trim, which provides a unified appearance. For wood or fiber cement siding, consider wood or fiber cement trim to ensure that the materials are compatible, both in appearance and durability.
2.2. Durability and Weather Resistance
When selecting materials, consider the climate and weather conditions in your area. For homes in areas prone to extreme weather, choose materials that can withstand harsh conditions, such as fiber cement or high-quality PVC trim. These materials offer superior resistance to moisture, UV rays, and temperature fluctuations, ensuring your siding and trim last for years.
2.3. Aesthetic and Color Considerations
While durability is important, don’t overlook the aesthetic aspect. The trim can significantly affect your home’s curb appeal. Whether you choose a complementary color or a contrasting trim color, make sure it suits the overall look of your home. Darker trim colors can create a bold contrast, while lighter shades can create a more subtle and cohesive appearance.
3. Steps for Installing Corner Siding
Installing siding around corners is an essential step in ensuring that your exterior is both attractive and water-resistant. Follow these steps for a professional finish:
3.1. Measure and Cut the Siding
Start by accurately measuring the length of the corner. Use a level to ensure that the siding will be installed straight and aligned. Cut the siding to the necessary size, making sure to leave space for any trim or caulk that will be applied later.
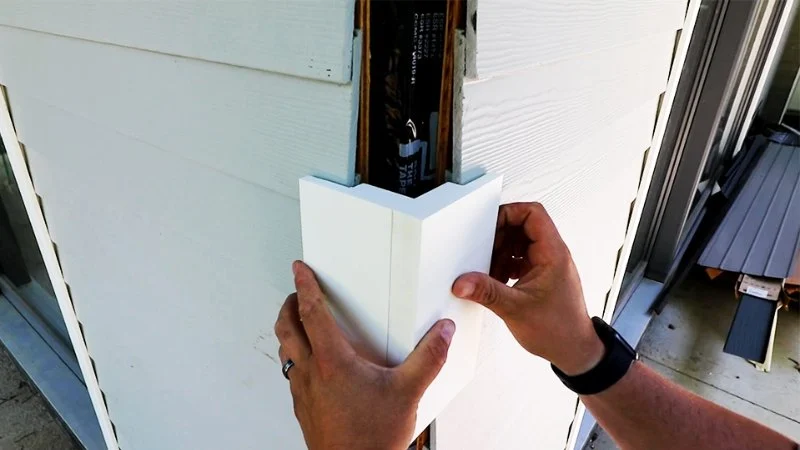
3.2. Install the Corner Trim
Once the siding is cut, begin by installing the corner trim. For most siding types, the corner trim should be fastened securely to the framing or wall studs. This trim will cover the edges of the siding and provide a finished look. Ensure the trim is aligned with the level and perfectly centered on the corner.
3.3. Attach the Siding
Next, attach the siding panels to the wall, starting from the bottom and working your way up. Overlap each piece as necessary to create a waterproof barrier. Ensure each panel fits snugly against the corner trim, sealing any gaps and preventing water from getting behind the siding.
3.4. Seal the Joints
Once the corner siding is installed, apply caulk to seal any joints where the siding meets the trim. This step ensures that water cannot penetrate the corners, reducing the risk of moisture-related damage. Use a high-quality, weather-resistant caulk for the best protection.
4. Installing Trim Finishes for a Polished Look
Trim finishes are the final touch that brings everything together. Here’s how to achieve a polished, professional look:
4.1. Cut and Fit the Trim
Measure and cut the trim pieces to fit perfectly around windows, doors, and corners. Precision is key to achieving a neat and finished look. If the trim requires angled cuts, use a miter saw to ensure that the edges are clean and even.
4.2. Attach the Trim
Secure the trim pieces with nails or screws, making sure to leave a small gap between the trim and the siding to prevent the trim from absorbing moisture. For added durability, consider using a trim adhesive in addition to nails for extra hold.
4.3. Finish with Caulk and Paint
Once the trim is installed, apply a thin layer of caulk along the edges to seal any gaps and prevent water infiltration. After the caulk dries, apply a fresh coat of paint or stain to enhance the trim’s appearance and ensure that it matches or complements the siding color.
5. Common Mistakes to Avoid During Siding Installation
To achieve the best results, it’s important to avoid these common mistakes during your siding and trim installation:
5.1. Inaccurate Measurements
One of the most common mistakes is failing to measure accurately before cutting and installing siding and trim. Always double-check your measurements to ensure everything fits properly and securely.
5.2. Skipping the Sealing Process
Skipping the sealing of joints or gaps can lead to water infiltration, which can cause mold, mildew, and structural damage. Take the time to apply high-quality caulk and sealant to every seam and joint for maximum protection.
5.3. Using Incompatible Materials
Using incompatible materials for siding and trim can result in poor adhesion, color mismatches, or insufficient protection. Always choose materials that are specifically designed to work together and complement your siding choice.
By following these siding installation tips and using the right materials and techniques, you’ll ensure that your home has a beautifully finished, durable, and water-resistant exterior. For more expert advice on siding installation and roofing solutions, visit Total Roofing Hub to find the best products and services for your project.


 Windsor Metal Roofing LLC5.0 (23 reviews)
 Sykes Restorations5.0 (20 reviews)
 W.D. Hutchinson Roofing LLC5.0 (29 reviews)
 RBC Construction Inc4.0 (4 reviews)
 Qualified Roofing LLC4.0 (100 reviews)
 Reliable Roofing & Restoration5.0 (43 reviews)
 Should I Repair or Replace My Roof? Expert Guide for Homeowners
 Siding Moisture Barriers & House Wrap: What Homeowners Should Know
 The Pros and Cons of Vinyl Siding: Is It Right for Your Home?
 Best Roofing Materials for Cold Climates – Durable Options for Winter
 Common Siding Warranty Mistakes and How to Avoid Them
 How Often Should You Replace Your Home's Siding? Expert Guide for U.S. Homeowners