
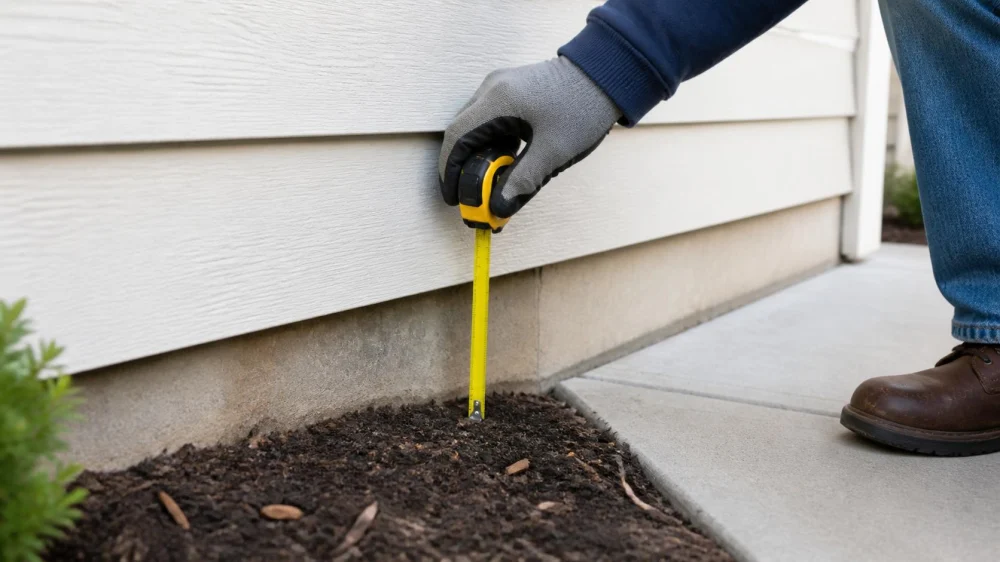
Siding Too Close to Soil: What Homeowners Should Check
On this page
Quick answer
Siding that touches soil, mulch, roofing gravel, or a hard surface may stay damp, collect splashback, hide pests, and fall outside the product’s installation requirements. Photograph and measure the condition from stable ground, check for swelling, staining, softness, and drainage problems, then compare the exact siding instructions and local requirements. Do not simply caulk the bottom edge or bury it with more landscaping.
This guide is for United States homeowners reviewing accessible siding near grade, patios, walkways, roofs, and decks. It provides general inspection and contractor-planning guidance. Required clearance depends on siding material, manufacturer instructions, the adjacent surface, wall assembly, climate, and local code.

Why siding clearance matters
Siding clearance is the separation between the lower edge of a cladding product and a nearby surface such as soil, mulch, concrete, a deck, or roof covering. Clearance helps keep the siding away from persistent moisture and allows key drainage and inspection areas to remain visible.
When landscaping or paving rises too close to siding, several conditions can develop:
- Moisture exposure. Wet soil, mulch, snow, irrigation, and splashback can keep the bottom edge damp.
- Material deterioration. Wood-based and fiber-cement products can respond differently to prolonged moisture, while metal and vinyl systems have their own corrosion, movement, and ventilation concerns.
- Hidden drainage details. Weep paths, flashings, foundation transitions, starter components, and the bottom of the weather-resistive system may be concealed.
- Pest access. Vegetation and soil against the wall can hide insect activity, gaps, and damage.
- Foundation inspection limits. Covering the transition makes it harder to see cracks, water entry, and termite inspection zones where those are relevant.
- Warranty or code concerns. A product installed outside published requirements can complicate performance and warranty evaluation.
A small gap is not automatically adequate, and a large exposed foundation band is not automatically required everywhere. The correct target is assembly-specific. Guessing a universal number can lead to an unnecessary repair or leave a real defect uncorrected.
American Builders CNY
Montour FallsSchuyler CountyNew York
223 S Catharine St, Montour Falls, NY 14865, USA
A ground-level inspection checklist
- Walk the perimeter in dry weather. Stay on stable ground and keep clear of electrical service equipment, steep slopes, animals, and dense vegetation.
- Photograph each transition. Capture wide views at soil, mulch, concrete, decks, steps, and lower roof areas. Add close photos where the siding nearly touches.
- Measure without forcing the material. Hold a tape beside the gap rather than pushing it under siding. Record the smallest visible separation and the adjacent surface type.
- Look for surface changes. Note swelling, flaking finish, soft edges, rust, white deposits, staining, algae-like residue, cracks, loose panels, or distorted bottom courses.
- Check drainage direction. Observe whether soil and pavement appear to direct water away from or toward the wall. Watch gutter and downspout discharge during rain from a safe location.
- Review landscaping. Note piled mulch, new planting beds, irrigation heads, roots, or grade changes that may have reduced the original clearance.
- Check interior clues. In an accessible basement, crawlspace, or room, look for stains, dampness, odors, damaged finishes, or pest evidence near the same exterior area.
- Identify the siding. Find project records, invoices, product labels in stored offcuts, or prior contractor documents. Do not rely only on appearance to distinguish similar materials.
Do not pry the bottom course away from the wall, probe soft areas with a screwdriver, remove starter strips, block visible openings, or dig next to utilities or the foundation without locating hazards. A ground-level survey should preserve the evidence for a qualified inspection.
Why siding material changes the answer
Wood and engineered wood can absorb moisture at cut ends, damaged finishes, and exposed surfaces. Product-specific sealing, flashing, and separation requirements matter. A soft or swollen lower edge deserves prompt evaluation.
Fiber cement is not identical to wood, but installation instructions still commonly address separation from soil, roofing, decks, and hard surfaces. Bottom edges, joints, and field cuts must be assessed using the specific manufacturer’s requirements.
Vinyl siding is part of a drainage-oriented wall system and needs room for movement. Soil or pavement can block the bottom edge, distort panels, cover starter components, and conceal the wall behind it. Caulking every opening can interfere with intended drainage.
Metal siding may be affected by trapped moisture, incompatible materials, coatings, and corrosion at cut edges or fasteners. Contact with treated lumber, masonry, or soil can create project-specific concerns.
Stucco, masonry veneer, and panel systems have distinct weeps, screeds, flashings, sealant joints, and termination details. Do not apply lap-siding advice to a different cladding system. The assembly must be identified before a repair is designed.
The adjacent surface matters too. Soil and mulch hold water and can change height; hard paving creates splash and may bridge drainage details; a roof-to-wall location requires roofing and flashing coordination. One side of the house may therefore need a different remedy from another.
What a repair plan may include
A good repair corrects the cause of inadequate clearance, not just the visible edge. Depending on the finding, the scope may include:
- removing excess mulch or soil while preserving safe drainage and foundation conditions;
- adjusting landscaping or irrigation so water is not directed at the wall;
- correcting a downspout or surface-drainage problem;
- altering paving or deck details when they were built too close to the cladding;
- removing damaged lower siding courses to inspect sheathing, flashing, and framing;
- replacing deteriorated materials with compatible components;
- restoring manufacturer-required clearances, terminations, and drainage paths; and
- repairing finishes and landscaping only after hidden conditions are resolved.
Lowering soil may be appropriate when fill or mulch was added over time, but excavation must not undermine a foundation, expose footings improperly, damage waterproofing, or create a low area that holds water. Utility location and drainage design may be required.
Cutting siding higher may be considered only as part of a system-specific detail that handles the cut edge, flashing, weather barrier, pests, and appearance. A straight saw cut by itself can expose the wall to new problems.
Caulk is not a universal fix. Sealing the bottom of cladding can trap water or block drainage and movement. Use sealant only where the siding and accessory manufacturer specifies it, with compatible preparation and joint design.
Questions for a siding contractor
Share perimeter photos, measurements, siding records, landscaping changes, and interior moisture clues. Ask:
- What exact siding product or system is present, and how was it identified?
- Which manufacturer detail and local requirement apply at soil, concrete, decks, and roofing?
- Is damage limited to the finish, or should the wall behind the siding be inspected?
- How will the repair maintain flashing, drainage, ventilation, pest control, and movement?
- Does the grade or paving need correction by another trade?
- Which materials will be removed, retained, tested, or replaced?
- How will repaired siding match the existing profile, texture, color, and exposure?
- What written warranty applies to the repair?
For a complex foundation, drainage, or deck interface, a building-envelope professional, landscape drainage contractor, mason, or structural professional may need to coordinate with the siding installer.
Evidence and limitations
This guidance reflects common cladding practice: keep siding terminations away from moisture-holding and splash surfaces, preserve drainage details, and follow the exact product installation instructions. It intentionally avoids a single clearance measurement because products, surfaces, and jurisdictions differ.
A visual ground survey cannot determine concealed sheathing condition, flashing continuity, insect damage, or code compliance. Manufacturer literature, approved project documents, local requirements, and an on-site inspection provide the decision evidence.
Frequently asked questions
How much space should be between siding and soil?
Use the clearance stated for the exact siding product and wall condition, then confirm local requirements. Soil, concrete, decks, and roofing may each have different details. A contractor should cite the applicable source rather than guessing.
Can I just pull mulch away from the siding?
Removing piled mulch may improve the condition if it can be done without damaging drainage, roots, utilities, or the foundation. Confirm that the resulting grade still directs water appropriately and that hidden siding damage is assessed.
Why should siding not touch concrete?
Concrete can create splash, hold moisture at an interface, and restrict a cladding termination. Some products specify a different separation from hard surfaces than from soil. Use the product detail for that transition.
Does staining at the bottom mean the siding is rotten?
No. Staining can come from soil splash, algae-like growth, minerals, coatings, or material deterioration. Do not probe or label it from color alone. Have soft, swollen, delaminated, or recurring wet areas inspected.
Can a contractor cover the bottom with trim?
Trim may be part of an approved transition, but decorative coverage alone can hide damage or block drainage. Ask for the complete flashing, weather-barrier, clearance, material-compatibility, and pest-control detail.
Should I check this before buying a home?
Yes, ground contact and reduced clearance are useful conditions to document during a home inspection. The finding should lead to material identification and repair evaluation; it does not determine cost or hidden damage by itself.
Next steps
Walk the perimeter from stable ground, photograph and measure the smallest siding gaps, and note soil, mulch, concrete, decks, roofing, irrigation, and downspout conditions. Identify the siding product and compare its installation details with local requirements. If the material is soft, swollen, stained, concealed by grade, or associated with interior moisture, request a system-level inspection before caulking or cosmetic repair.






 Rock & Rollers Painting4.0 (176 reviews)
 Christian Roofing & Remodeling4.0 (369 reviews)
 LP Home Improvement Llc5.0 (5 reviews)
 Repair Hero - Local Handyman Services5.0 (18 reviews)
 Hugo's Construction & Remodeling5.0 (5 reviews)
 Olis Wood Inc.5.0 (24 reviews)
 How to Prepare Attic Access Before a Roof Inspection
 Roof Talk: Common Terminology Every Homeowner Should Know
 Role of Roof Sheathing Moisture Barrier: Why It’s Essential for Your Roof
 Siding Material Maintenance in Maple Wood, Cedar or Composite: Tips for Long-Lasting Protection
 Cost vs Longevity: Premium Roofing Materials Worth the Extra Cost
 How to Choose a Reliable Roofing Contractor Near You | Expert Tips