
Lap Siding Butt Joints: Flashing, Gaps, and Caulk Questions
On this page
- Quick answer
- What a lap siding butt joint is
- Why joint movement must be expected
- How joint flashing can manage water
- Why caulk rules vary by siding system
- Safe signs to inspect from the ground
- What matters behind the siding
- Questions before a joint repair
- Confirm details on a new siding project
- What not to fill, nail, or paint over
- Frequently asked questions
- Conclusion and next steps
Quick answer
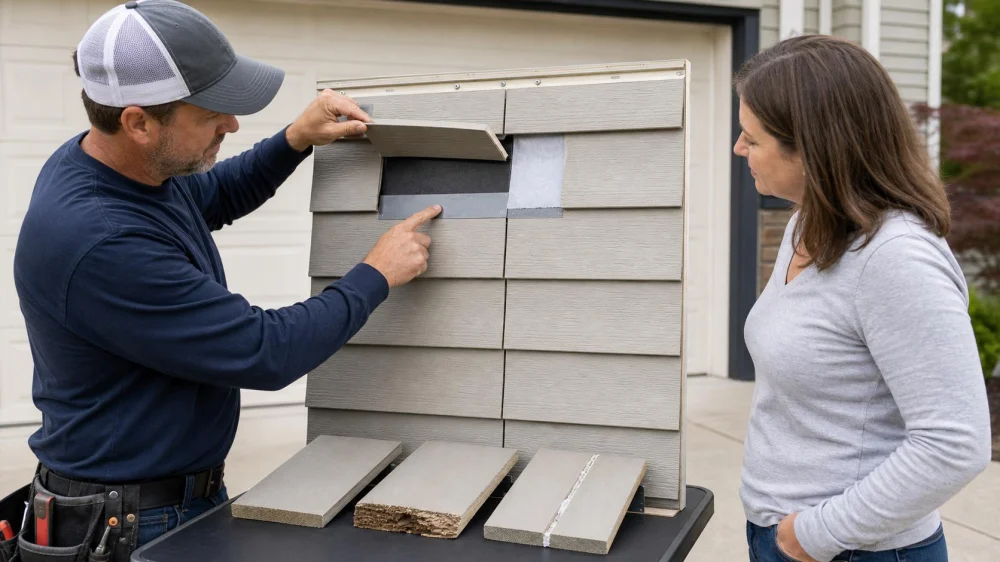
A lap siding butt joint is where the ends of two boards meet on the same horizontal course. The correct gap, flashing, sealant, finish, and fastener placement depend on the siding product and wall assembly. Do not automatically caulk every visible joint. Ask the installer to follow the current manufacturer instructions, integrate joint flashing with the drainage plane, allow required movement, and document the exact repair or installation detail.
This guide is not a siding installation specification. Fibre cement, engineered wood, natural wood, vinyl, metal, and composite lap siding use different joint and movement details.
Star Course Roofing
Fountain ValleyOrange CountyCalifornia
18627 Brookhurst St Suite 524, Fountain Valley, CA 92708, USA
What a lap siding butt joint is
Lap siding boards run horizontally and overlap the course below. When one board is not long enough to span the wall, its end meets another board end. That vertical meeting line is a butt joint.
Joints may be tight, gapped, flashed, sealed, covered with a moulding, or arranged with a specific factory edge, depending on the product. A joint appearance that is correct for one system can be wrong for another.
Why joint movement must be expected
Siding changes dimension with temperature, moisture, and humidity. The amount and direction vary by material. Building framing can also move, and boards installed too tightly or fastened incorrectly may buckle, crack, separate, or push against trim.
Manufacturer instructions may specify a minimum or maximum end gap, contact condition, fastener distance, or field treatment. The installer should account for the conditions at installation and the expected range afterward.
How joint flashing can manage water
Some lap siding systems use a durable flashing piece behind each butt joint. The flashing catches incidental water that enters the joint and directs it back out over the face of the course below. It should extend far enough behind both board ends and remain integrated with the wall’s drainage approach.
Flashing should be compatible with the siding, fasteners, water-resistive barrier, and nearby metals. A scrap of absorbent paper, unsupported tape, or surface caulk is not automatically an approved substitute.
Why caulk rules vary by siding system
Some manufacturers direct installers not to caulk field butt joints because the joint needs to move and drain. Other systems use sealant at defined joints or against trim with a specified gap and compatible backer material.
Caulk applied without a system plan can trap water, bridge a movement gap, crack, collect dirt, or hide missing flashing. Before adding it, identify the exact siding product and find the current published detail.
Safe signs to inspect from the ground
- joints that line up in a continuous vertical stack contrary to the planned layout;
- cracked, squeezed-out, missing, or heavily smeared sealant;
- board ends that are swollen, chipped, unpainted, or soft;
- staining or streaks below a joint;
- boards that overlap, tent, or pull away from the wall;
- visible fasteners close to an edge or driven through the face unexpectedly;
- open joints that changed significantly since installation.
Use zoom photography from stable ground. Do not pry a joint open or insert a probe.
What matters behind the siding
The wall should manage water in layers. Joint flashing, the water-resistive barrier, window and door flashing, penetrations, starter and termination details, and clear drainage paths all contribute. A cosmetic joint repair cannot correct a failed layer behind the wall.
If staining, softness, repeated paint failure, or interior moisture is present, the investigation may need limited removal to inspect sheathing, flashing, and framing. Plan containment and replacement materials before opening the wall.
Questions before a joint repair
- What manufacturer and exact siding product is installed?
- What did its instructions require at the time, and what repair detail applies now?
- Is flashing present and correctly positioned?
- Are board ends damaged or only the finish?
- Is the gap caused by normal movement, poor fastening, or substrate movement?
- Will repair require board removal, joint flashing, end sealing, or repainting?
- How will colour and texture be matched?
Confirm details on a new siding project
Ask the contractor to include the product, exposure, joint layout, flashing material, end treatment, sealant locations, fastener schedule, clearances, and finish in the written scope. Request a small mockup showing a typical field joint and a trim joint before full installation.
During work, photograph the water-resistive barrier and joint flashing before boards cover them. Pause if the crew proposes an unapproved substitution or a caulk-every-joint approach that conflicts with the manufacturer detail.
What not to fill, nail, or paint over
- Do not caulk every joint based only on appearance.
- Do not hammer exposed board ends back into place.
- Do not add face nails without checking product requirements and hidden utilities.
- Do not fill movement gaps with rigid patching material.
- Do not paint over wet, swollen, decayed, or contaminated material.
- Do not remove siding from a ladder without suitable access and fall protection.
Frequently asked questions
Should lap siding butt joints be caulked?
Not universally. Follow the exact product’s current repair or installation detail. Many systems use flashing behind field joints rather than surface caulk.
Why did a joint open after winter?
Temperature, moisture, fastening, board condition, and framing movement can all contribute. Measure and document the change for a qualified installer.
Can paint close a small joint?
Paint is a finish, not a movement joint or water-management repair. Bridging a gap can crack and hide the condition temporarily.
Does every joint need visible metal flashing?
The required flashing and whether it is visible depend on the siding system and detail. A professional may need to inspect behind a representative joint.
Conclusion and next steps
Identify the siding product before deciding how a butt joint should look or be repaired. From the ground, document gaps, staining, sealant, board-end damage, and movement. Ask the installer to show the manufacturer detail and explain joint flashing, drainage, movement, fastening, and finish. Repair the layered water-management system rather than hiding the joint with generic caulk.

 iGreen Solutions INC4.0 (36 reviews)
 Narrow Path Roofing & Construction5.0 (36 reviews)
 Nasco Roofing & Construction0.0 (0 reviews)
 Renovation Pros4.0 (289 reviews)
 Keefer's Roofing5.0 (9 reviews)
 GMC Construction & Restoration LLC4.0 (16 reviews)
 How to Maintain Roof Valleys and Downspouts for Long-Term Protection
 How to Prepare Your Roof for Solar Panel Installation
 How to Choose Roofing Materials for Long-Term Protection
 How Solar Panel Weight Impacts Roof Structure & Installation
 How Often Should You Replace Roof Shingles? Complete Guide for Homeowners
 How to Detect & Address Hidden Water Damage Behind Your Siding